How to Deploy Ruby Code on AWS Lambda: A Brief Guide from Manual to Automated
从手动到自动,部署 Ruby 代码到 AWS Lambda
Recently, I've made some new attempts to develop and deploy some of the features that are not very relevant to the main business as separate AWS Lambda - it's also a step forward in the trend of serverless development. This post is based on what I learned from deploying Ruby code to AWS Lambda.
Currently, AWS Lambda supports languages such as Node, Python, Java, .NET, Ruby, and Go (in the form of a custom runtime). I chose to use Ruby as the Lambda development language in this attempt, even though it's not considered mainstream, for these reasons:
- AWS Lambda supports Ruby runtime;
- I'm familiar with Ruby, so I can develop faster;
- Ruby's testing framework, RSpec, is easy to read and write, so it's easier to do unit testing.
Of course, this article is not about why I chose Ruby, so I won't expand on it. The reason why I mention this part is because the choice of language also has a little impact on the deployment process.
When it comes to deploying Ruby lambda, my first thought is that we will encounter these problems:
- How to package Ruby projects, especially when there are C extension dependencies
- When deploying to AWS, how to operate the Permission step.
Below is a list of the different deployment methods I've learned about, and I'll intersperse it with a description of how I've solved the above problems:
Lambda Console
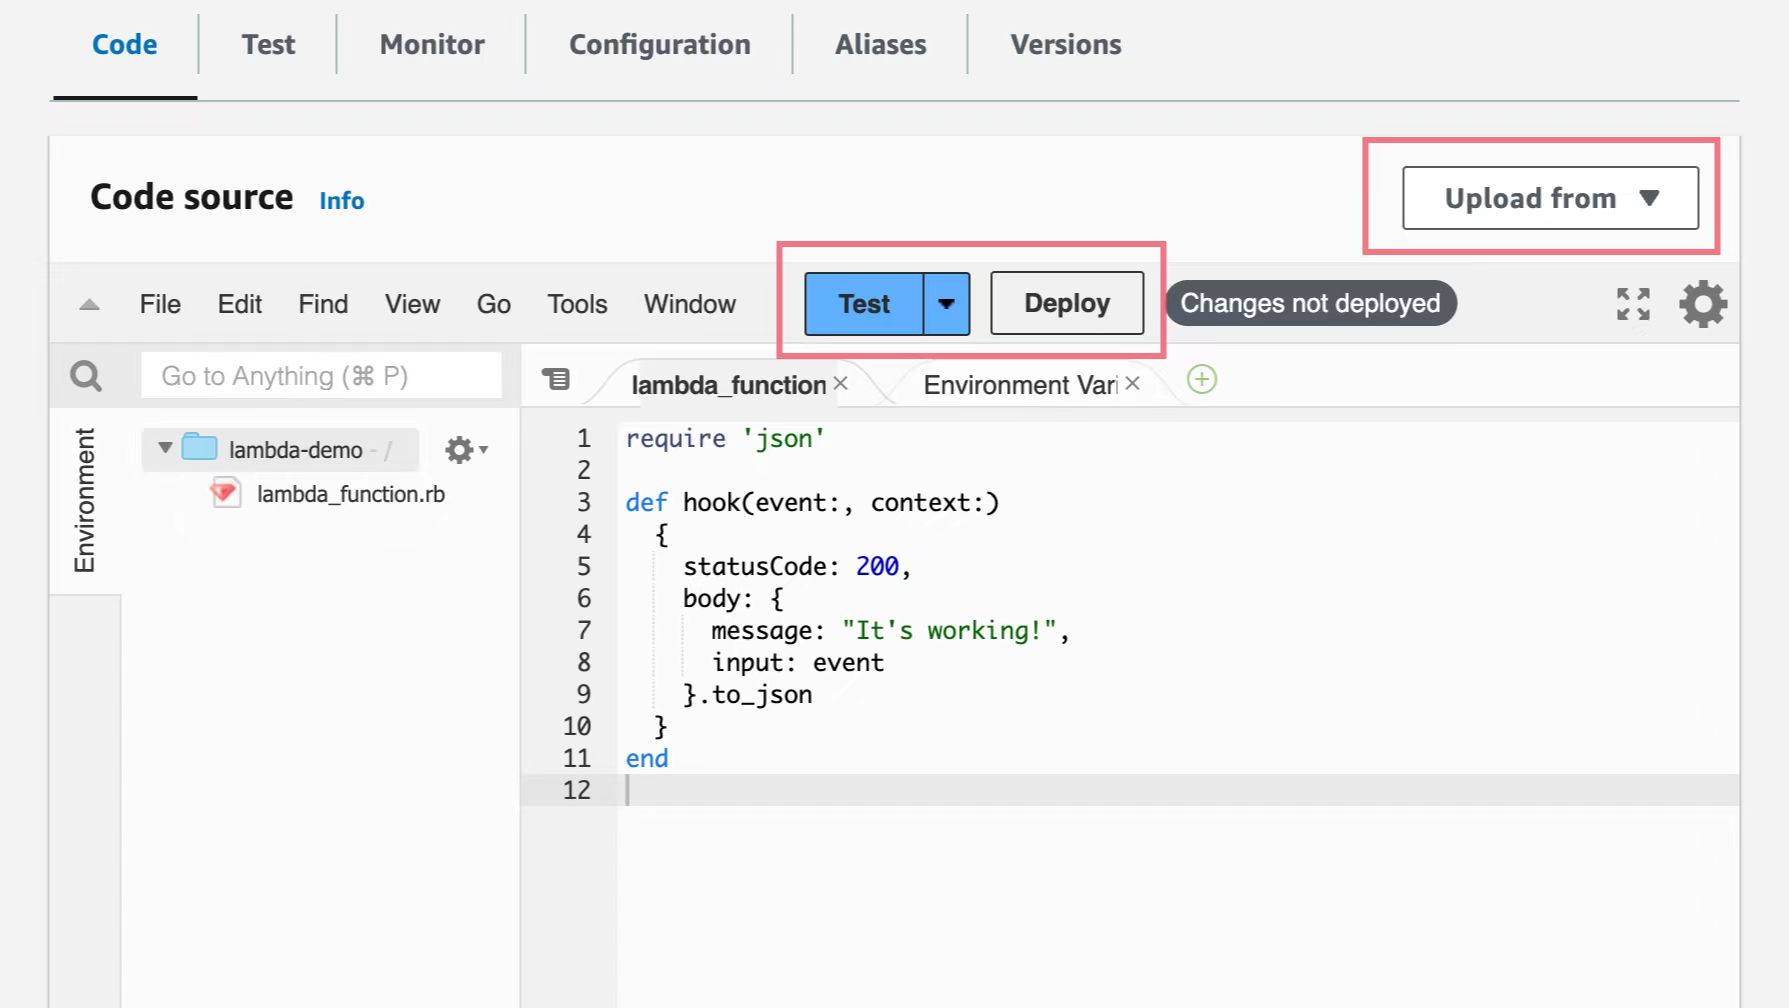
The AWS Lambda Console is naturally the easiest way to do this, and you can just click Deploy after modifying the file. Of course, it is advisable to do some testing before clicking Deploy.
This method is only suitable for very simple lambda and is not recommended for cases involving multiple files and dependencies. Also, the console editor is not available when the code size exceeds 3 MB, according to AWS limitations.
In the top right corner of the interface, we can also see an "Upload from" button, which is the next deployment method we can talk about.
Zip and AWS CLI
In the above section, we talked about how we can deploy lambda by clicking "Upload from", so here's how to do it.
Let's assume that our project structure looks like this, which is of course the usual Ruby lambda directory structure:
lambda-demo
│   .gitignore
│   Gemfile
│   Gemfile.lock
│   README.md
│   lambda.rb
└───lib
└───spec
└───vendor
We can organize the project structure of lambda in the same way as we would a ruby gem, with the following files that must be packaged at deployment time:
- lambda.rb is the entry file for lambda. It doesn't have to be called that, as long as the name of the file and the name of the method defined in it are consistent with the runtime settings configured for lambda.
- lib contains several files or directories where the lambda implementation is stored.
- vendor is where the dependent gems are stored. Since lambda executes with a basic ruby runtime, these gems need to be packaged and deployed with lambda (unless the dependencies are deployed separately).
Other files and directories, such as REAMD and spec, are not required for lambda to run and do not need to be packaged.
The commands to package them are also relatively simple:
$ bundle install --standalone --path vendor/bundle
$ zip -r lambda.zip vendor lib lambda.rb
Now that we have a packaged lambda.zip file, we have two options:
- Manually - In the Lambda Console, click the "Upload from" button, select the ".zip file" method, and then select the zip file you just created.
- utilize the AWS CLI to complete the upload and deployment with the following commands (provided you have configured AWS locally and have permissions):
$ aws lambda update-function-code --function-name myFunction \
  --zip-file fileb://lambda.zip
AWS also supports uploading the zip file to S3 and then deploying it from S3.
For more details, you can check the official documentation: Working with .zip file archives for Ruby Lambda functions
Serverless Framework
One deployment tool that Ruby on Rails developers often use is capistrano, which allows you to configure and deploy to the server with a single command, cap production deploy to upload, install dependencies, compile, restart the server, and so on. Is there such a tool for lambda deployment? The answer is serverless.
Serverless is a complete framework for AWS Lambda, covering everything from project creation and configuration to deployment, and supporting a wide range of languages, making it very convenient.
Serverless relies on node.js, so after making sure you have a node.js environment, this is all you need to install it:
npm install -g serverless
Once the installation is complete, we can use the serverless command, or an abbreviated version of the sls command, and it is recommended that you run serverless help first to see what this tool can do.
When creating a new lambda project, serverless allows us to create it from a template, and the serverless community provides many examples that save you the trouble of organizing your project, as well as available code. It's basic but powerful, for example:
For example, if we want to create a new LINE bot, just do this:
$ serverless --template-url=https://github.com/serverless/examples/tree/v3/aws-ruby-line-bot
When executed, we can see the following:
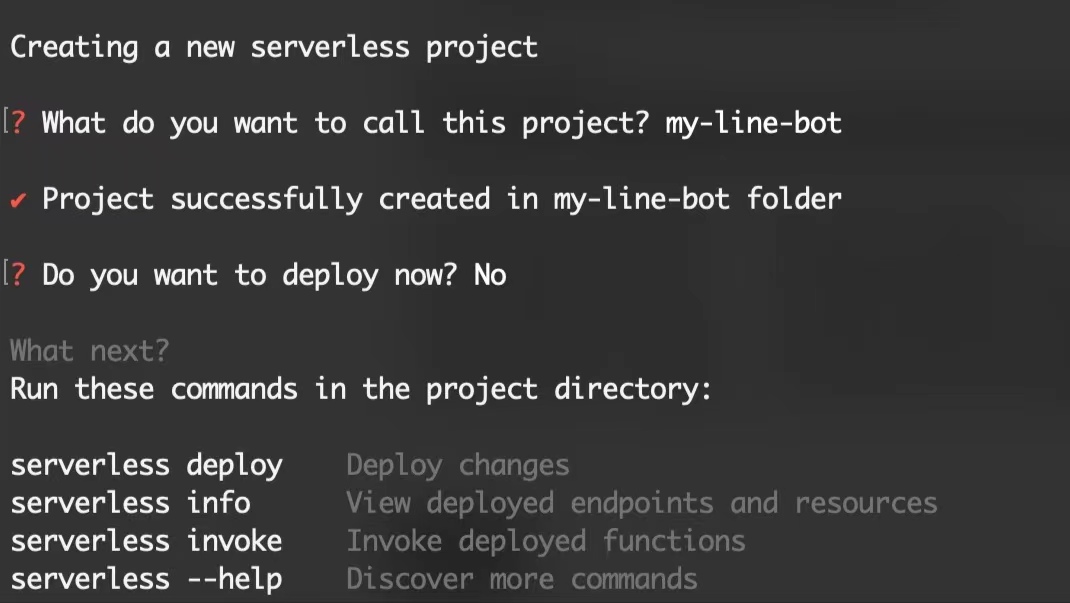
On creation, it asks me if I want to deploy it, and I choose No. It gives the above hints in "What next?", where its deployment command is also very concise, namely sls deploy.
Of course, it's not as simple as that, and we actually need to go to the serverless.yml file under the project to configure it. The serverless.yml we get from the LINE bot template looks like this:
service: my-line-bot

frameworkVersion: "3"

provider:
  name: aws
  runtime: ruby2.7

functions:
  webhook:
    handler: handler.webhook
    events:
      - http:
          path: webhook
          method: post

plugins:
  - serverless-hooks-plugin

custom:
  hooks:
    package:initialize:
      - bundle install --deployment
In reality, there's a lot of configuration we'll have to do: for example, now that AWS Lambda doesn't support Ruby 2.7, we'll need to replace provider.runtime with ruby3.2 (which will support Ruby 3.3 in April 2024); and there are a lot of things we can configure in serverless.yml, including API Gateway, ALB, VPC, and SQS, which can be configured in serverless.yml, as described in the documentation.
The Serverless framework is very powerful, but its use depends on the DevOps context. If your team relies exclusively on Terraform to manage AWS resources, your freedom to use serverless may be limited.
Jets Framework
While Serverless is a language- and platform-specific cloud function framework, Jets, or Ruby on Jets, is positioned more like a Lambda (Cloud Function) version of Ruby on Rails, officially described as "The Ruby Serverless Framework":
Ruby on Jets allows you to create and deploy serverless services with ease, and to seamlessly glue AWS services together with the most beautiful dynamic language: Ruby. It includes everything you need to build an API and deploy it to AWS Lambda. Jets leverages the power of Ruby to make serverless joyful for everyone.
In short, if you're skilled in rails development, you'll feel very familiar when utilizing jets.
The Getting Started documentation for Jets is very interesting, as the author breaks down the learning path into the following three branches, depending on the purpose for which you are creating the project:
- Job
- API
- HTML
Assuming we're going to go down the API route (which is the best use case for jets), we first need to install jet. jet is released as a gem, and its installation and project creation is very similar to rails:
$ gem install jets
$ jets new demo --mode api

      create
       exist
      create  .env
      create  .gitignore
      create  .jetsignore
      create  .rspec
      create  Gemfile
      create  README.md
      create  Rakefile
      create  app/controllers/application_controller.rb
      create  app/helpers/application_helper.rb
      create  app/javascript/application.js
      create  app/jobs/application_job.rb
      create  app/models/application_record.rb
      create  config.ru
      create  config/application.rb
      create  config/database.yml
      # ...
From the files it generates, many of the concepts of Jets, as well as the project structure, are lightweight versions of rails, with a very low and smooth learning curve.
Deployment is also relatively easy, and can be accomplished with a single command after configuring AWS:
$ jets deploy
The essence of jets deployment is that it is also packaged as a zip file and uploaded to S3, with the slight difference that it utilizes AWS's CloudFormation, where jets creates a set of template-based CloudFormation stacks based on the template, including resources such as Lambda, API Gateway, PreheatJob, etc. - you can batch manipulate resources, which is an advantage of utilizing CloudFormation. In addition, it helps to do version control, which allows us to revert stacks to a certain version.
Access Control
One thing to note here is the issue of permissions. I haven't mentioned permissions before because I'm assuming that the operator is deploying locally and has full access to AWS Resouces. If the account doesn't have enough permissions, then neither the AWS CLI nor serverless will deploy successfully. Permission control will be mentioned again in the CI/CD Pipeline below.
Here, since jets are published using CloudFormation, the resources are created using stack. If our lambda needs to create an SQS, the Role associated with the stack needs to have the appropriate permissions to create the SQS, see AWS CloudFormation service role. latest/UserGuide/using-iam-servicerole.html).
Gem Layer
The deployment process for jets involves a lot of "magic". Gem Layer is one of them. jets packages the gems dependencies into the Gem Layer, and if our Gemfile - that is, our dependencies - haven't changed, then the Gem Layer layer doesn't need to be changed, and we just need to deploy the code in our project, which actually reduces the size of the package and increases the speed of deployment.
CI/CD Pipeline
Strictly speaking, the CI/CD Pipeline is not a standalone deployment method, it just takes the above mentioned approach (of course, Lambda Console excluded) and automates it.
Workflow for AWS CLI
Using Github actions as an example, and assuming we need to run rspec and deploy it via the AWS CLI, a base version of the workflow might look like this:
name: Package and Deploy Lambda

on:
  push:
    branches: [ 'main' ]

jobs:
  setup-ruby:
    runs-on: ubuntu-latest
    permissions:
      contents: read
      packages: write
    steps:
      - name: Checkout
        uses: actions/checkout@v3
      - name: Set up Ruby 3.2
        uses: ruby/setup-ruby@v1
        with:
          ruby-version: 3.2.2
      - name: Install Bundler
        run: gem install bundler --version 2.3.7

  unit-test:
    name: RSpec
    runs-on: ubuntu-latest
    permissions:
      contents: read
      packages: write
    needs: setup-ruby
    steps:
      - name: Checkout
        uses: actions/checkout@v3
      - name: Install dependencies and Run Rspec
        run: |
          bundle install --standalone --path vendor/bundle
          bundle exec rspec spec

  package-and-deploy:
    name: Package + Deploy
    needs: [ 'unit-test' ]
    runs-on: ubuntu-latest
    permissions:
      id-token: write
      contents: read
      packages: write
    steps:
      - name: Checkout
        uses: actions/checkout@v3
      - name: Use Ruby and Bundler
        uses: ./.github/actions/setup-ruby
      - name: Package
        run: |
          bundle config set without 'development test'
          bundle install --standalone --path vendor/bundle
          zip -r lambda.zip vendor lib handler.rb
      - name: Configure AWS Credentials
        uses: aws-actions/configure-aws-credentials@v2
        with:
          role-to-assume:
          role-session-name:
          aws-region:
      - name: Upload lambda to AWS
        env:
          FUNCTION_NAME: arn:aws:lambda:region:id:function:lambda-demo
        run: |
          aws lambda update-function-code --function-name $FUNCTION_NAME --zip-file fileb://${{ github.workspace }}/lambda.zip
In addition to the previous permissions issue, another thing to keep in mind here is the gem install or bundle install environment. Assuming we're using a gem with a C native extesion, this can be problematic - let's say we're compiling our gem on the arm64 architecture and lambda is running on the x86_64 architecture, which will obviously not work.
In the above workflow, we are compiling directly using the ubuntu-latest environment, which is generally not a problem if our lambda is also running on the x86_64 architecture. However, to be on the safe side, in this case it's better to build inside Docker and use the AWS runtime image:
FROM public.ecr.aws/lambda/ruby:3.2

COPY Gemfile Gemfile.lock ${LAMBDA_TASK_ROOT}/

RUN gem install bundler:2.4.20 && \
    bundle config set --local path 'vendor/bundle' && \
    bundle install

COPY lambda_function.rb ${LAMBDA_TASK_ROOT}/

# Set the CMD to your handler (could also be done as a parameter override outside of the Dockerfile)
CMD [ "lambda_function.LambdaFunction::Handler.process" ]
Workflow for Serverless
For deployments using serverless, there is an official workflow action for us.
Workflow for Jets
Running jets deploy locally is probably a more convenient way to deploy Ruby projects, similar to using cap deploy. But that doesn't stop us from using Gtihub workflow, and here's an example:
name: RSpec and Deploy Lambda

on:
  push:
    branches:
      - main

jobs:
  test:
    name: RSpec
    runs-on: ubuntu-latest
    permissions:
      contents: read
      packages: write
    steps: [] # similar above

  deploy:
    name: Deploy to Lambda
    needs: test
    runs-on: ubuntu-latest
    permissions:
      id-token: write
      contents: read
      packages: write

    steps:
      - name: Checkout
        uses: actions/checkout@v2
      - name: Set up Ruby
        uses: ruby/setup-ruby@v1
        with:
          ruby-version: 3.2
      - name: Install Bundler and Dependencies
        run: |
          gem install bundler
          bundle config set --local without 'development test'
          bundle install
      - name: Setup AWS CLI
        uses: aws-actions/setup-aws-cli@v2
        with:
          aws-access-key-id: ${{ secrets.AWS_ACCESS_KEY_ID }}
          aws-secret-access-key: ${{ secrets.AWS_SECRET_ACCESS_KEY }}
          aws-region: <your-aws-region>
      - name: Deploy to Lambda
        env:
          JETS_ENV: production
        run: |
          bundle exec jets deploy
Conclusion
In this post, we explored various methods to deploy Ruby code on AWS Lambda, covering both manual and automated approaches. Here's a summary of the methods discussed:
- Lambda Console
- ease of use
- suitable for basic lambdas with minimal dependencies.
- Zip and AWS CLI
- requires handling dependencies and packaging them with the deployment package
- provides more control over the deployment process compared to the Lambda Console
- Serverless Framework
- a comprehensive framework that simplifies the entire Lambda deployment process.
- requires configuring the serverless.yml file to define AWS resources and settings.
- supports multiple programming languages and provides a wide range of deployment features.
- Jets Framework
- Positioned as a Ruby on Rails equivalent for AWS Lambda.
- Ruby Familiarity: Leverages Ruby development skills and provides a Rails-like structure.
- CloudFormation Integration: Utilizes AWS CloudFormation for resource management, allowing batch manipulation of resources.